Pages
Note
Affected user: Webmaster and Administrator
Warning
From 2026, new interfaces have been deployed for Sciencesconf. If the conference is older, you can consult the:doc:Setup the website <.. /site/pages-old> for the old interfaces
Le menu du site public de votre conférence se paramètre dans Site Web > Pages. Il est possible d’organiser les menus avec des pages et des dossiers. Un dossier peut contenir plusieurs pages et être utilisé pour la création d’un sous-menu par exemple. Vous pouvez définir l’ordre description pages et dossiers par glisser/déposer.
L’icone de crayon permet d’accéder à l’intitulé, au lien permanent de la page et aux droits de consultation et de modification de la page. L’icone de crayon sur papier permet de modifier le contenu des pages paramétrables.
You can add predefined pages or customizable pages:
Homepage: it constitutes the Headline of the website;
Link : allows you to link to an external page;
File: allows to display a document in the browser or to link it to a page;
Submission of a communication;
Consultation of communications by author, by speaker, by theme or by type of document;
Search for a conference paper;
Program;
Conference registration;
Resources: RSS feed, photo gallery, list of participants, access, sponsors, news;
Customizable page: to create information pages.
You can also add as many customizable pages as you want.
After adding a page, you must click the `Save` button to see the page in the menu and then be able to edit it.
Note
Only one page can be created per page type except for ‘Link’, ‘File’, ‘Customizable page’ and ‘Photo gallery’ pages.
The different types of pages
Homepage
The homepage is automatically added when creating the site and cannot be deleted.
By default, the home page contains the content of the description you entered when you requested to create a website.
To change it, click the “Update page content” icon on the Home line or click Website > Homepage.
The homepage content is divided into blocks with a title and content.
Click “Add a block of text” to add content as blocks. You can move the blocks with then arrows to the left of each block. See next picture.

Web link
With this page, you add a link to your Menu.
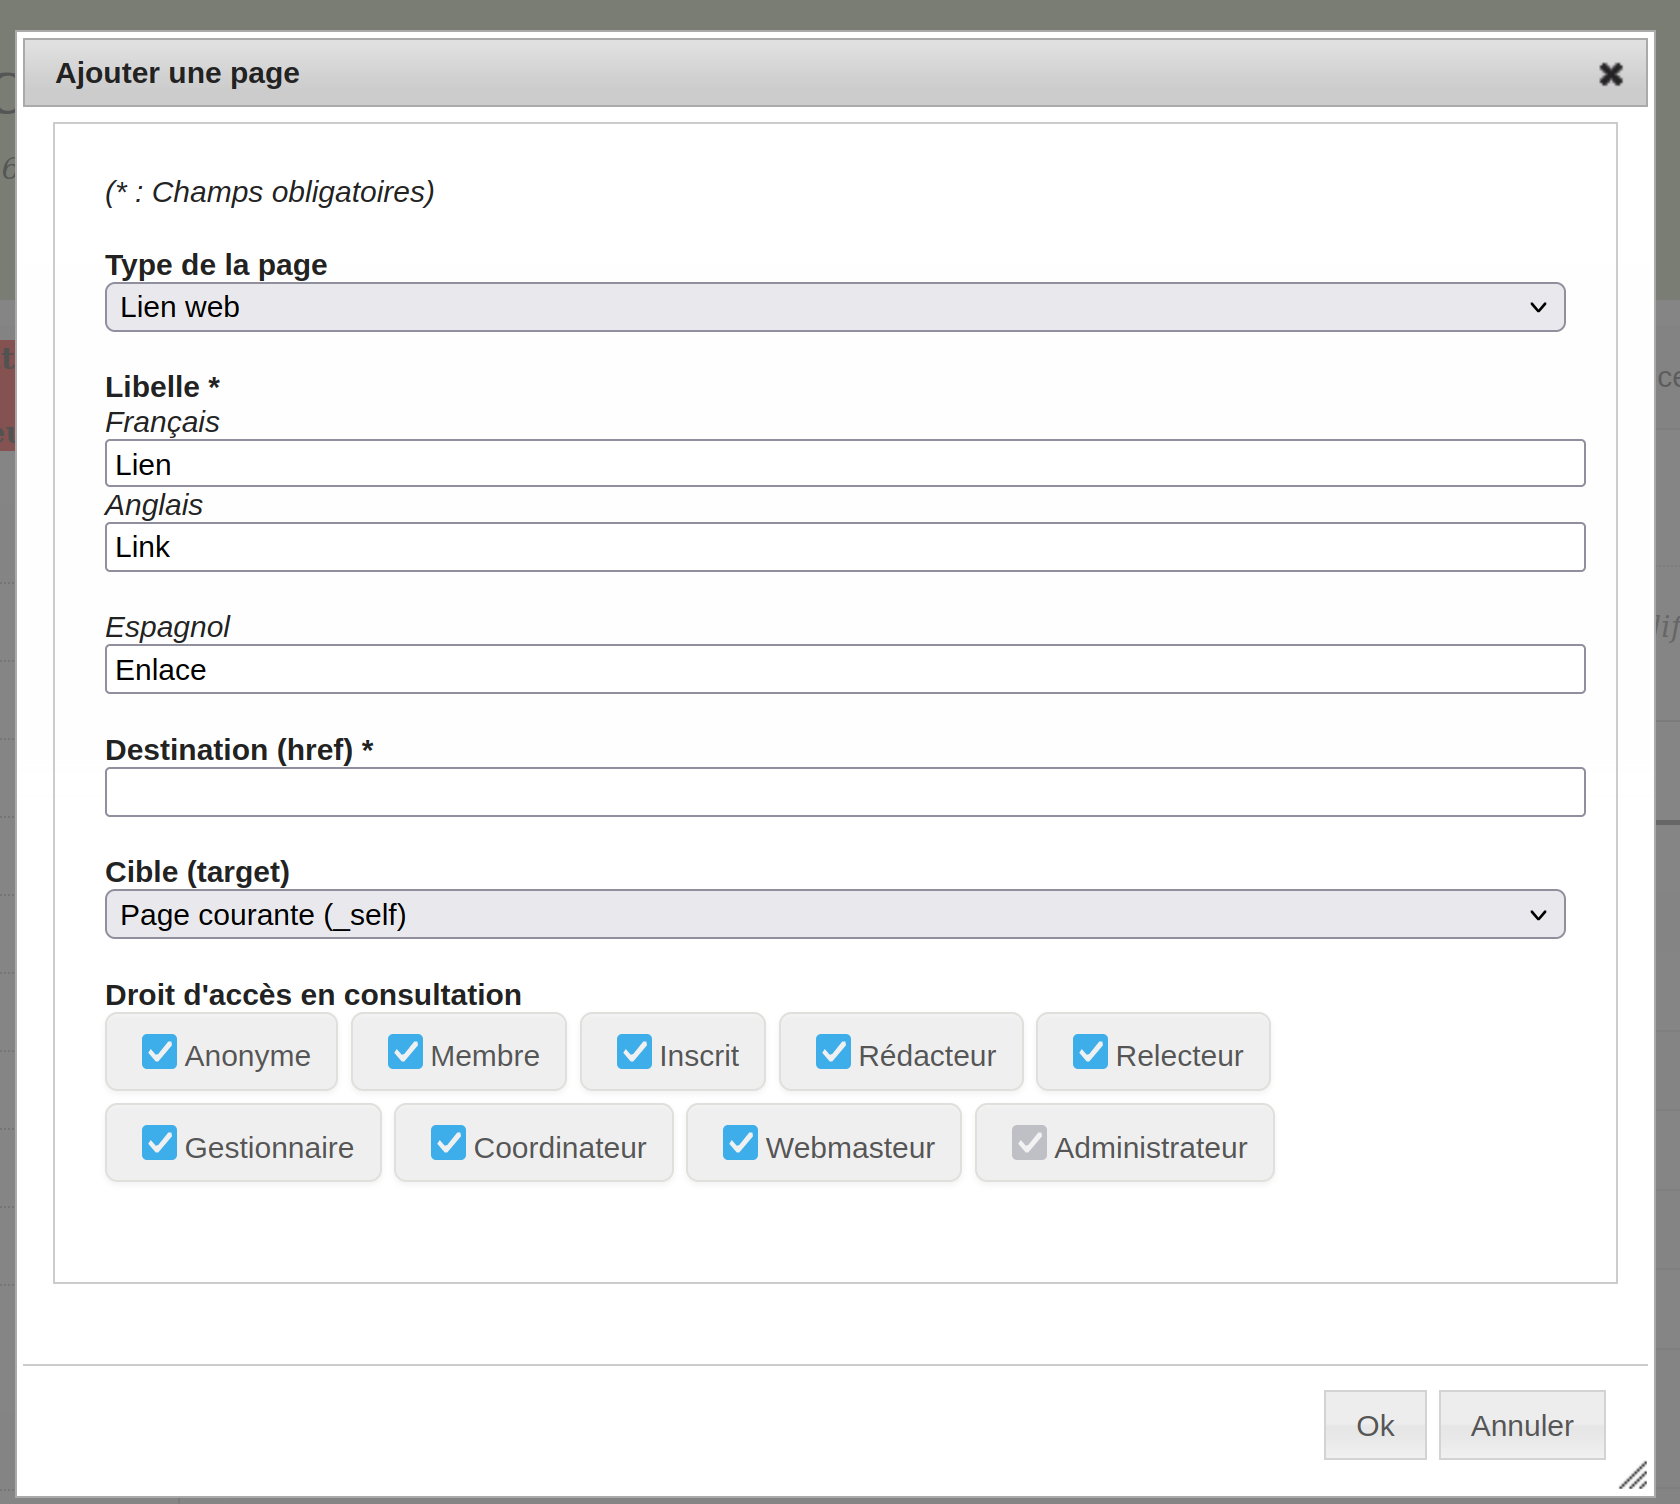
In the Label field, enter the text that will appear in the menu,
In the Destination field, enter the URL of the site
The Target field, allows you to choose whether to display the site on the current page or open a new tab.
Finally, you can define which role the users must have to see the page.
You can add multiple pages of this type.
Example: pages indicating nearby hotels.
File
With this page, you add a file to your Menu.
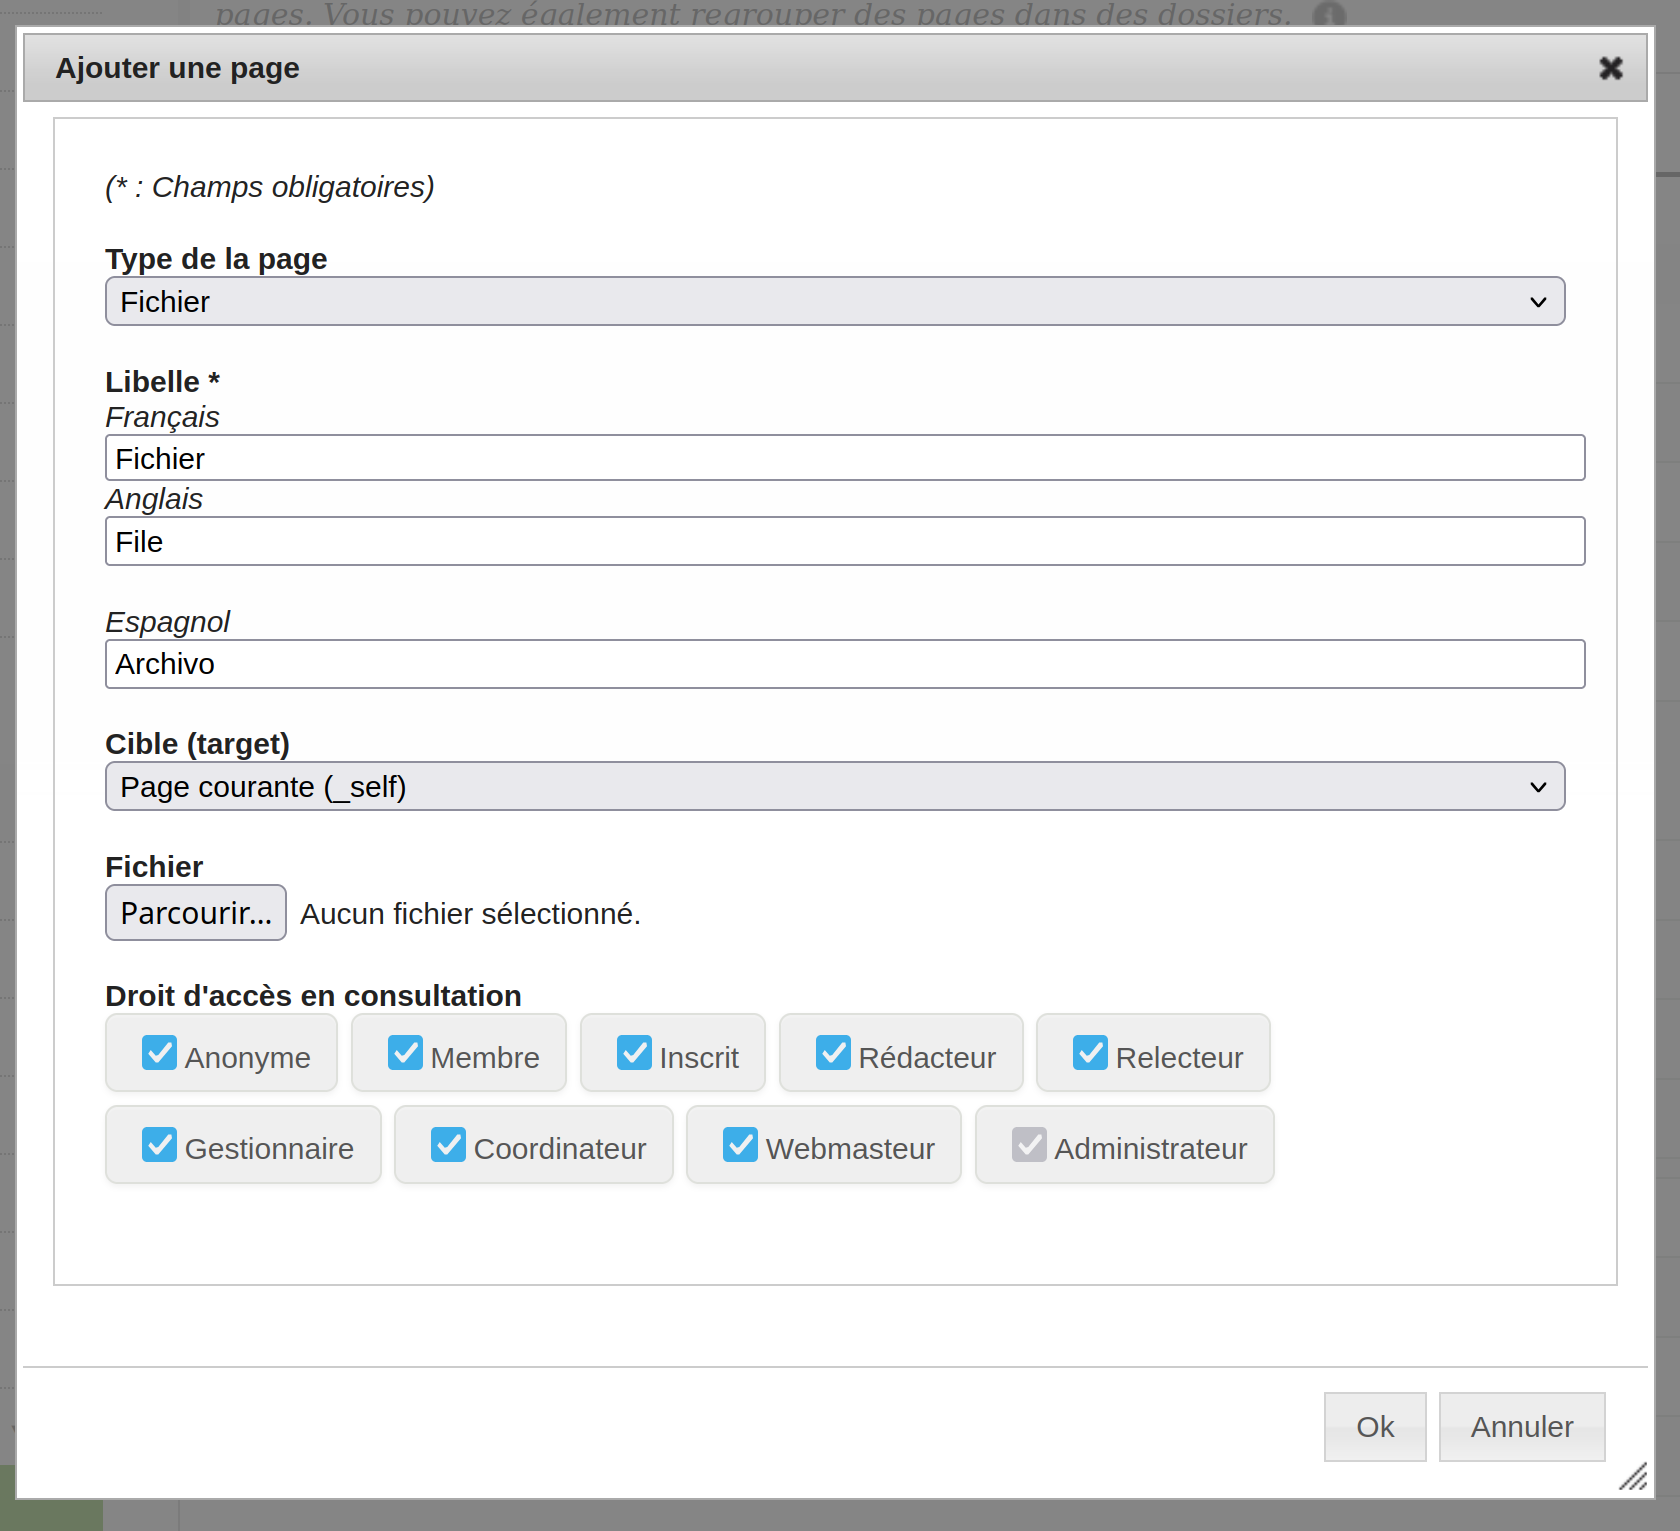
In the Label field, enter the text that will appear in the menu,
The Target field, allows you to choose whether to display the site on the current page or open a new tab.
Click on the `Browse button to select the file to download.
Finally, you can define which role will be able to see the page.
You can add multiple pages of this type.
Example: a file with a campus map, a program made entirely by you, a list of restaurants nearby, etc.
Customizable page
This page is fully configurable using a text editor.
If your site is in multiple languages, the content must be configured in all languages of the site before you can save the page.
The text editor allows you to switch to HTML mode if you want to customize the page in more detail.
You can add multiple pages of this type.
Browse by
You can add pages to view accepted repositories. The types of consultations are by Author, Speaker, Document type or Topic.
In the Label field, enter the text that will appear in the menu,
And you can define which role will be able to see the page.
Search
This page allows users to search for a deposit against the mandatory fields filled in by depositors.
In the Label field, enter the text that will appear in the menu,
And you can define which role will be able to see the page.
Program
The Program page makes the program accessible to users in the Navigation menu. The configuration of the program content is done in the Program menu
In the Label field, enter the text that will appear in the menu,
And you can define which role will be able to see the page.
To configure the program’s appearance, on the Website > Pages page, click on the action icon Edit content. This corresponds to the menu Program > Appearance (see Program > Appearance)
Registration
The Registration page allows users to access the registration form even if they are not logged in. The registration form is configured in the Registration management menu
However, account creation and login are mandatory for those registering for your conference.
In the Label field, enter the text that will appear in the menu,
And you can define which role will be able to see the page.
Photo gallery
With this page you can add images and create your own photo gallery.
In the Label field, enter the text that will appear in the menu,
In the field Permanent link, enter the URL of the page,
And you can define which role will be able to see the page and which role will be able to modify the page.
To add and/or delete photos in the gallery, on the Website > Pages page, click on the action icon Edit content. Then just upload the images that will be displayed in the gallery.
You can add up to 5 pages of this type.
List of Participants
The list of participants displays the list of people registered for the conference. It updates automatically when a registration is validated and paid if the registration is paid.
In the Label field, enter the text that will appear in the menu,
And you can define which role will be able to see the page and which role will be able to modify the page.
The list of items displayed for each registrant can be configured by clicking on the “Update page content” icon.
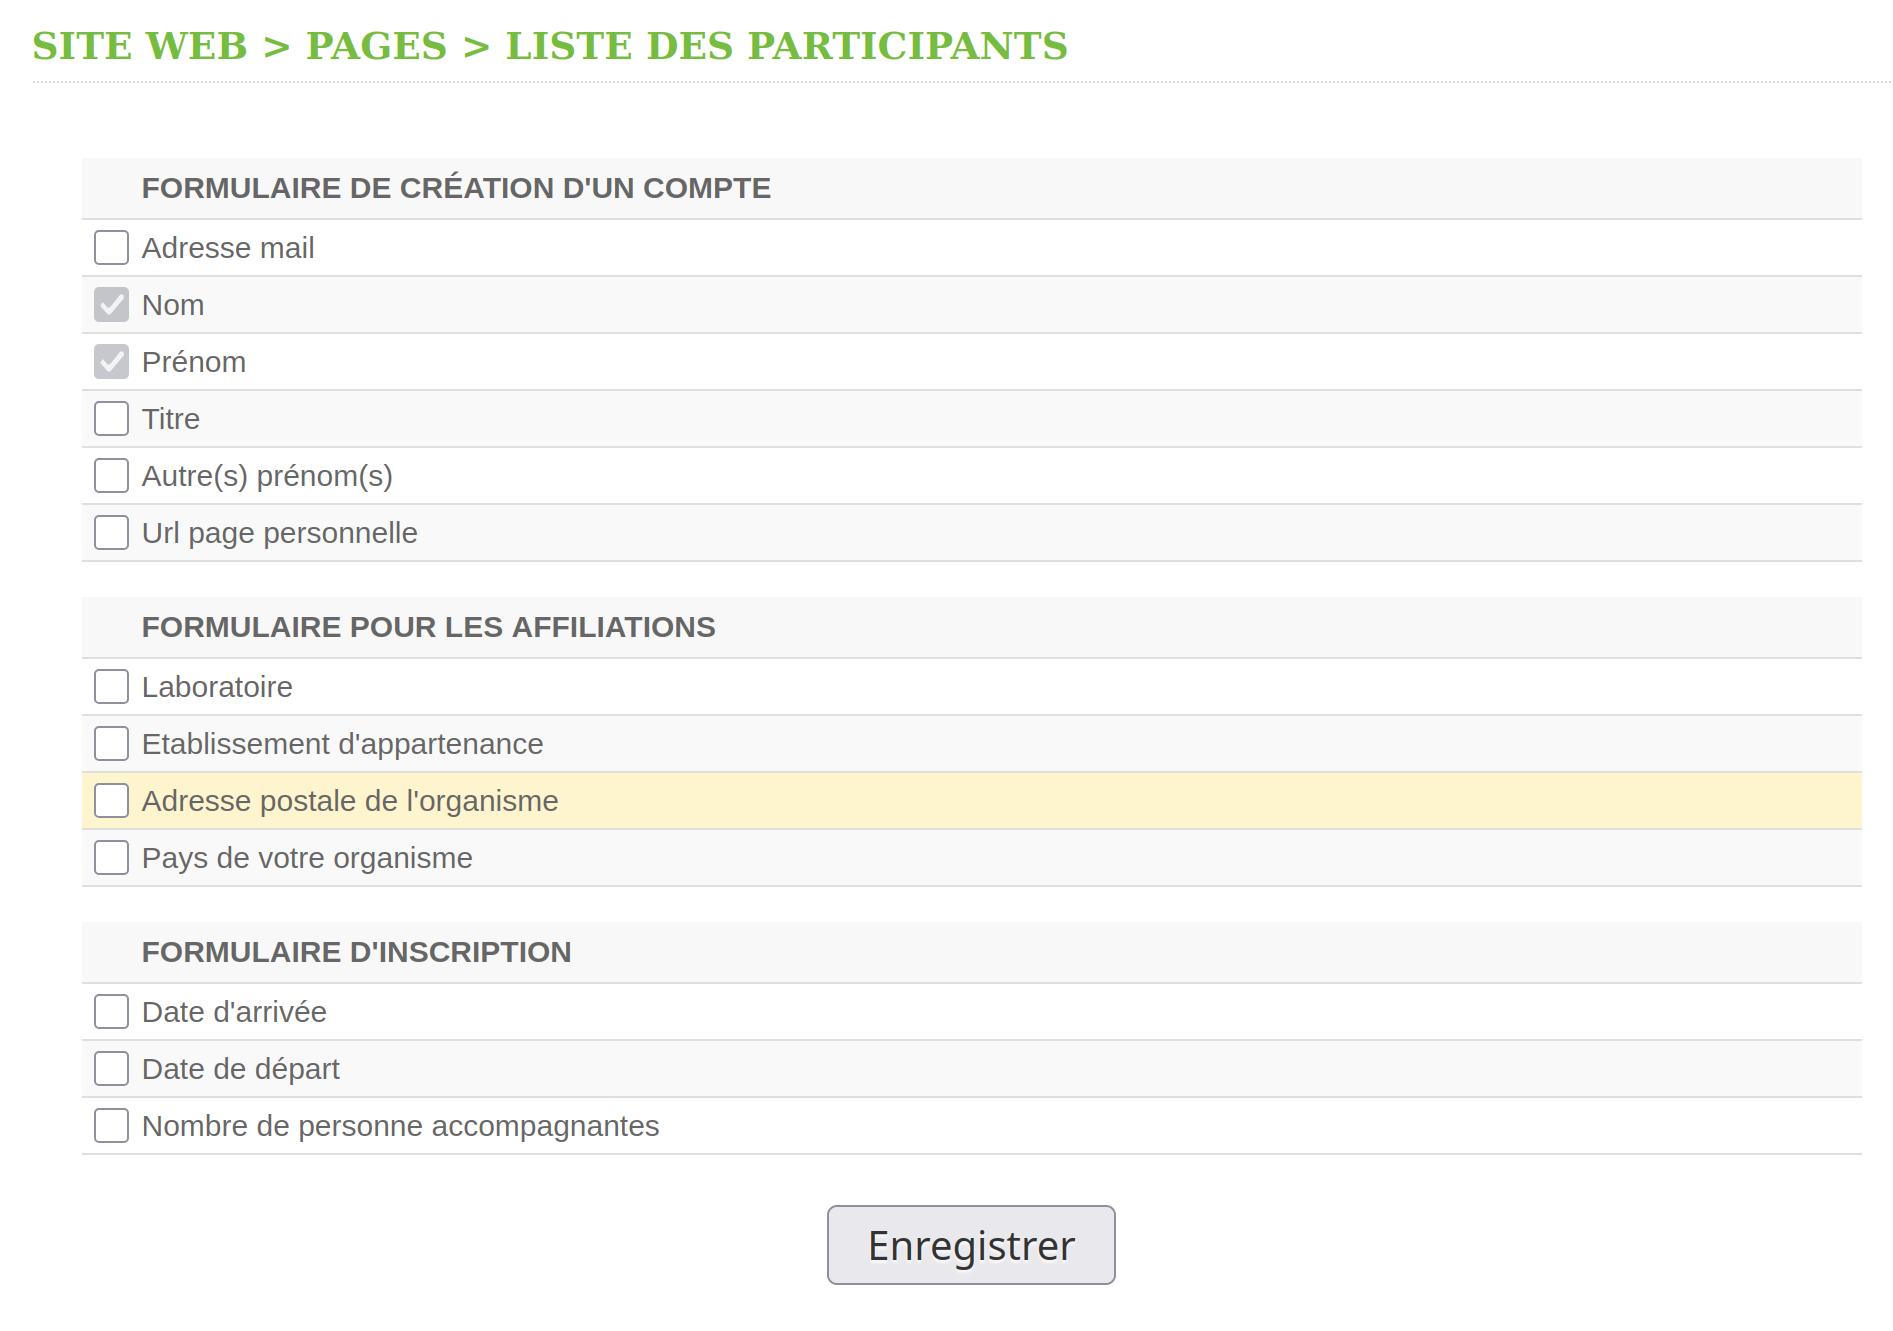
For each field of the registration form, you can check it if you want it to appear on the list of participants.
Click the `Save` button to save the information.
Tip
If the number of participants in the “List of participants” is not equal to the list of registered participants, it may be that the participants have not finalized their registration (no payment, incomplete registration), either the subscribers have not clicked on the link allowing them to validate the creation of their account.
Map
This page allows you to display a map.
In the Label field, enter the text that will appear in the menu,
And you can define which role will be able to see the page and which role will be able to modify the page.
To set the content of the page, on the Website > Pages page, click on the action icon Edit content. You can enter a descriptive or complementary text to the map and center the map using either geographical coordinates (latitude and longitude) or positioning on the map.
You can also insert geographic coordinates in the latitude-longitude field.
Sponsors
This page allows you to add sponsors.
In the Label field, enter the text that will appear in the menu,
And you can define which role will be able to see the page and which role will be able to modify the page.
You can add the list of sponsors, on the page Website > Pages, by clicking on the action icon Edit content.
For each sponsor, you can indicate his name, a description, a logo and possibly the URL of the sponsor’s website.
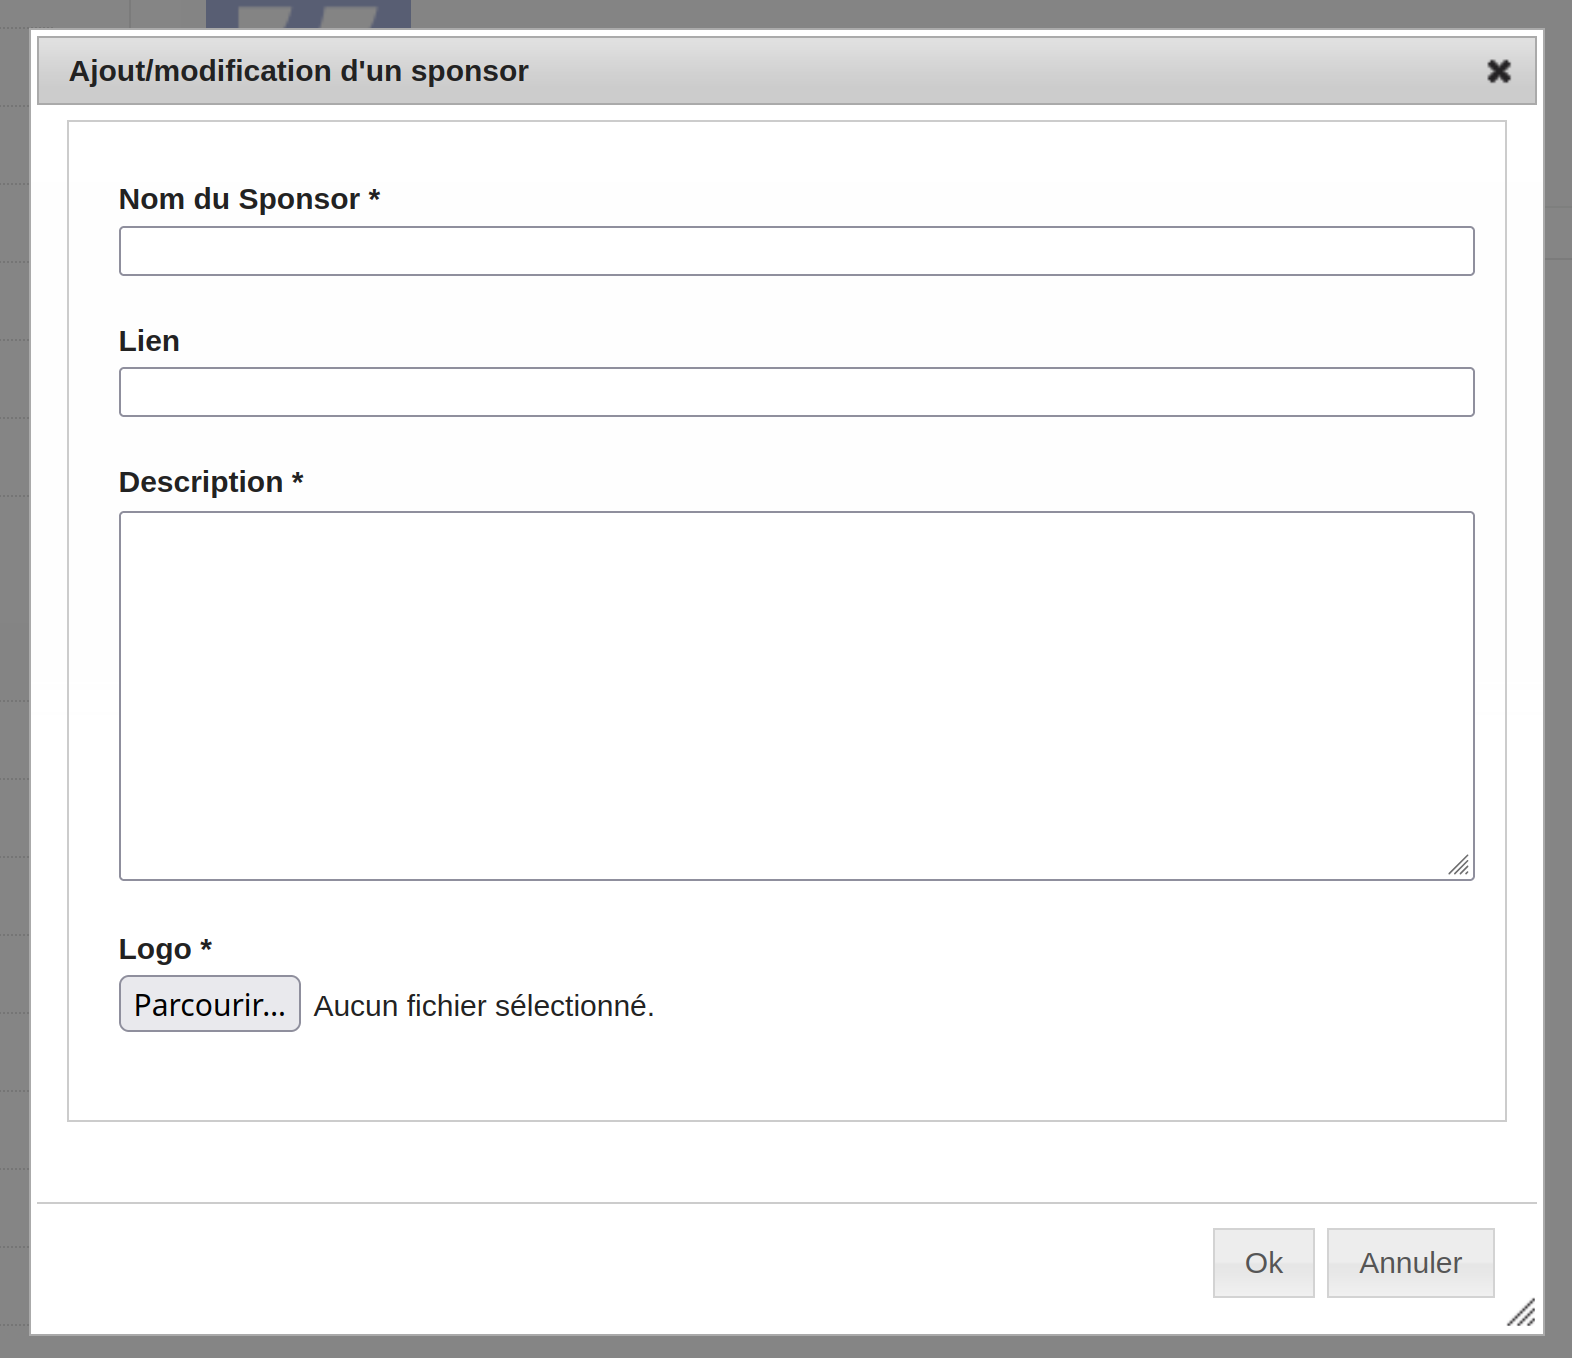
You can rearrange the list of sponsors by clicking and dropping on the list of sponsors.
RSS Feed
This page allows you to add an RSS feed address.
In the Label field, enter the text that will appear in the menu,
In the field Permanent link, enter the URL of the page in the menu,
In the RSS feed address field, enter the URL of the RSS feed,
And you can define which role will be able to see the page and which role will be able to modify the page.
Submit
With the addition of this page, users will be able to submit their submission from the Navigation section. Configuration of the submission form is done in the Editorial management menu
In the Label field, enter the text that will appear in the menu,
And you can define which role will be able to see the page.
However, account creation and login are mandatory for those who file a summary or communication.
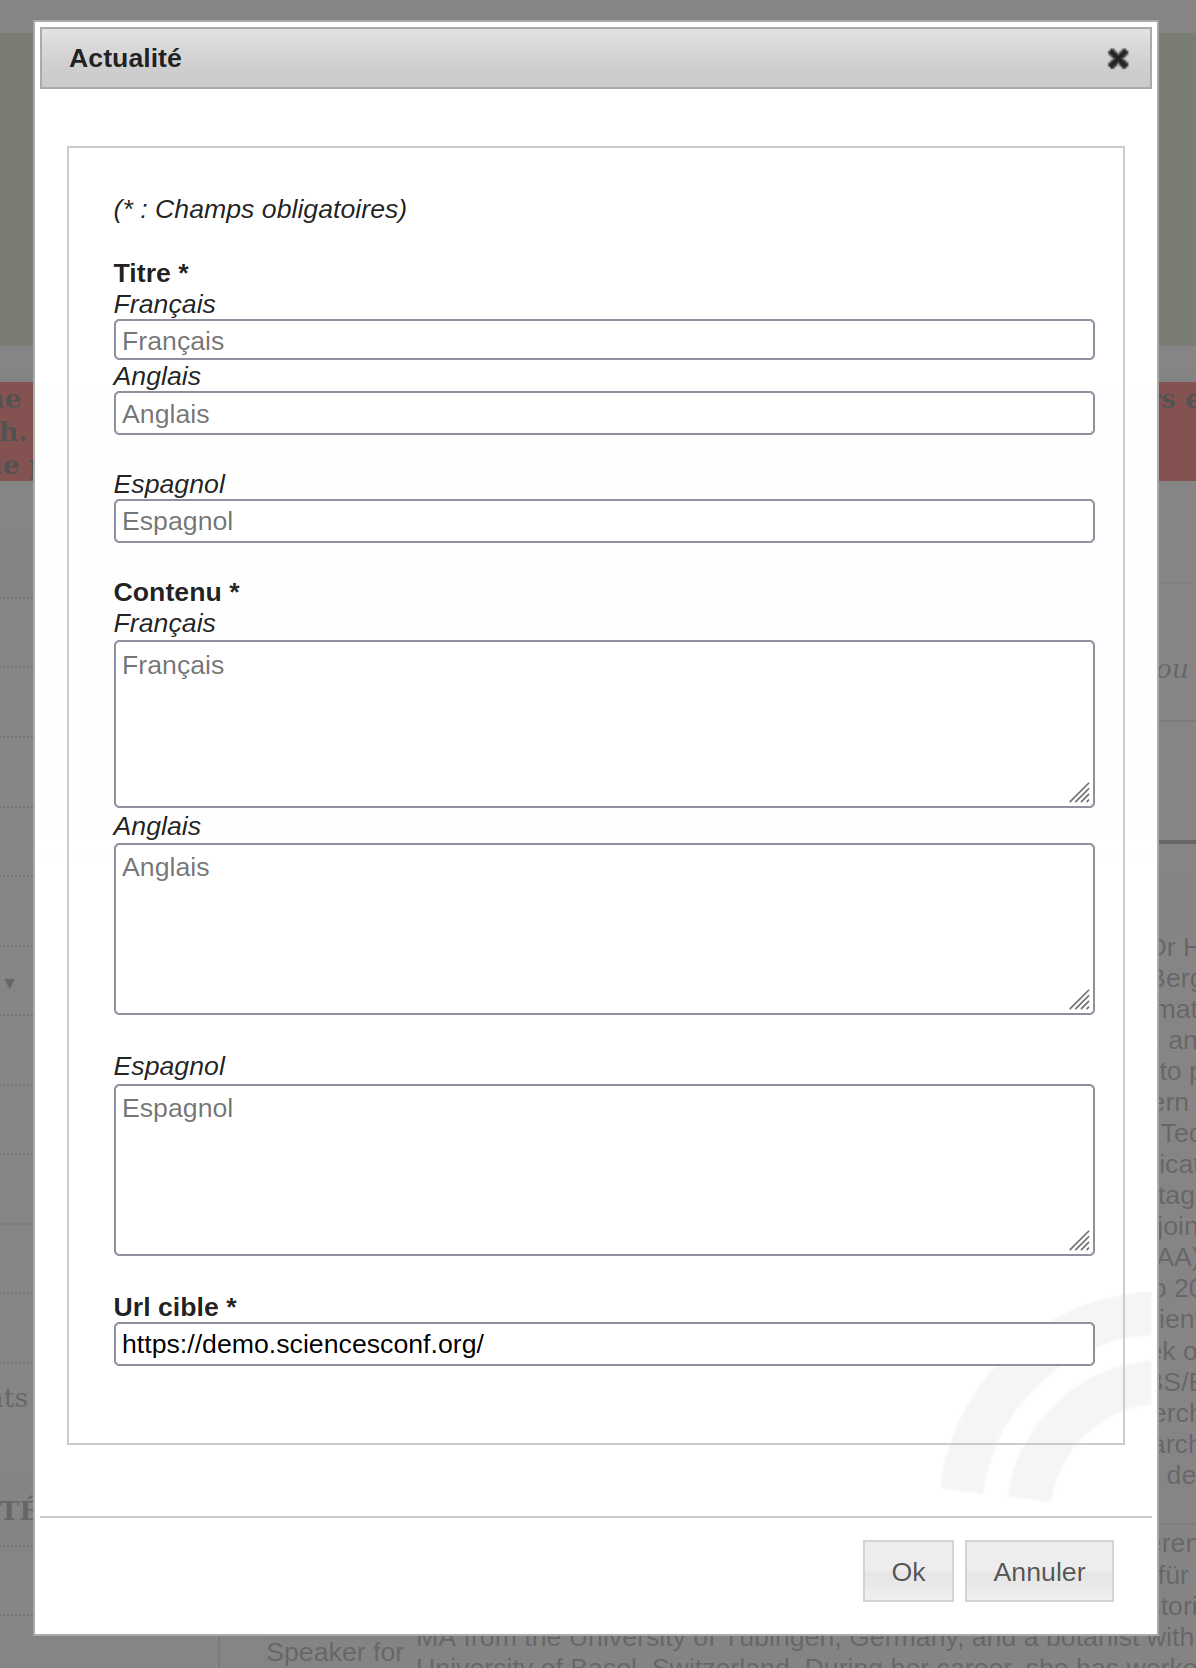
News
This page allows you to highlight your news via a dedicated page.
In the Label field, enter the text that will appear in the menu,
And you can define which role will be able to see the page and which role will be able to modify the page.
After creating the page, you can add news by going to the Website > Pages page and clicking on the action icon Edit content.
For each news item, indicate its title, content and target URL.
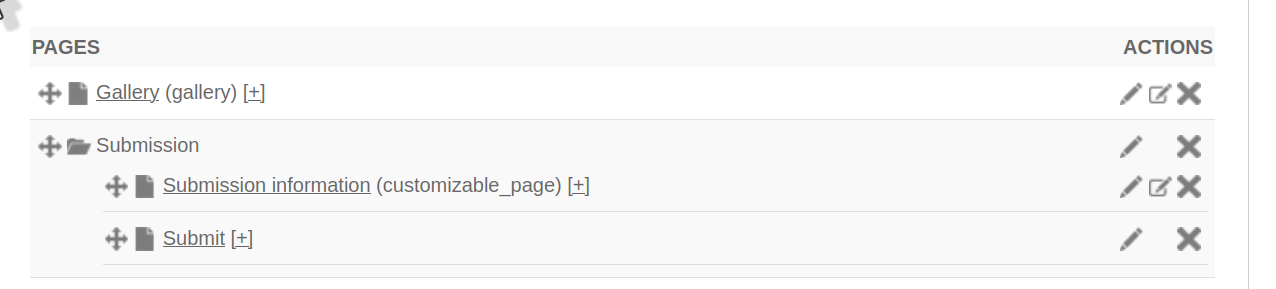
Add a folder (a page with subpages)
You also have the possibility to structure the menu by adding folders to group several pages. In Website > Pages, simply click on “Add a folder” and give it a name, then drag pages under this folder using the arrows to the left of each title.
It takes at least two pages to create a folder with subpages. If there is only one page in a folder, it will not be displayed, only the page will be visible.
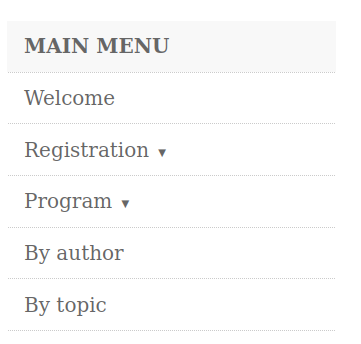
Example of a menu with some pages added:
- The menu must be registered in order to see the pages appear in the Menu and be able to edit their content using the
editing icon.
Consultation rights, right to modify and edit content
For all pages, you can change the viewing rights by type of user (pencil): public, member (person connected with a Sciencesconf account), editor, reviewer, manager, coordinator, webmaster and administrator).
For some pages, you can also set the modification rights.
